一、什么是线程?
线程是进程的一个实体,是CPU调度和分派的基本单位,它是比进程更小的能独立运行的基本单位。线程自己基本上不拥有系统资源,只拥有一点在运行中必不可少的资源(如程序计数器,一组寄存器和栈),但是它可与同属一个进程的其他的线程共享进程所拥有的全部资源。
二、什么时候使用多线程? 当多个任务可以并行执行时,可以为每个任务启动一个线程。
三、线程的创建 使用pthread_create函数。
#include<pthread.h>
int pthread_create (pthread_t *__restrict __newthread,//新创建的线程ID
			  __const pthread_attr_t *__restrict __attr,//线程属性
			  void *(*__start_routine) (void *),//新创建的线程从start_routine开始执行
			  void *__restrict __arg)//执行函数的参数
返回值:成功-0,失败-返回错误编号,可以用strerror(errno)函数得到错误信息
四、线程的终止 三种方式线程从执行函数返回,返回值是线程的退出码线程被同一进程的其他线程取消调用pthread_exit()函数退出。这里不是调用exit,因为线程调用exit函数,会导致线程所在的进程退出。
一个小例子:
启动两个线程,一个线程对全局变量num执行加1操作,执行五百次,一个线程对全局变量执行减1操作,同样执行五百次。
#include <stdio.h>
#include <stdlib.h>
#include <pthread.h>
#include <unistd.h>
#include <string.h>

int num=0;
void *add(void *arg) {//线程执行函数,执行500次加法
  int i = 0,tmp;
  for (; i <500; i++)
  {
    tmp=num+1;
    num=tmp;
    printf("add+1,result is:%d\n",num);
  }
  return ((void *)0);
}
void *sub(void *arg)//线程执行函数,执行500次减法
{
  int i=0,tmp;
  for(;i<500;i++)
  {
    tmp=num-1;
    num=tmp;
    printf("sub-1,result is:%d\n",num);
  }
  return ((void *)0);
}
int main(int argc, char** argv) {

  pthread_t tid1,tid2;
  int err;
  void *tret;
  err=pthread_create(&tid1,NULL,add,NULL);//创建线程
  if(err!=0)
  {
    printf("pthread_create error:%s\n",strerror(err));
    exit(-1);
  }
  err=pthread_create(&tid2,NULL,sub,NULL);
  if(err!=0)
  {
    printf("pthread_create error:%s\n",strerror(err));
     exit(-1);
  }
  err=pthread_join(tid1,&tret);//阻塞等待线程id为tid1的线程,直到该线程退出
  if(err!=0)
  {
    printf("can not join with thread1:%s\n",strerror(err));
    exit(-1);
  }
  printf("thread 1 exit code %d\n",(int)tret);
  err=pthread_join(tid2,&tret);
  if(err!=0)
  {
    printf("can not join with thread1:%s\n",strerror(err));
    exit(-1);
  }
  printf("thread 2 exit code %d\n",(int)tret);
  return 0;
}
使用g++编译该文件(g++ main.cpp -o main)。此时会报错undefined reference to `pthread_create'。
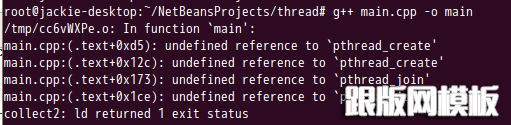
报这个错误的原因是:pthread库不是linux默认的库,所以在编译时候需要指明libpthread.a库。
解决方法:在编译时,加上-lpthread参数。
执行结果:
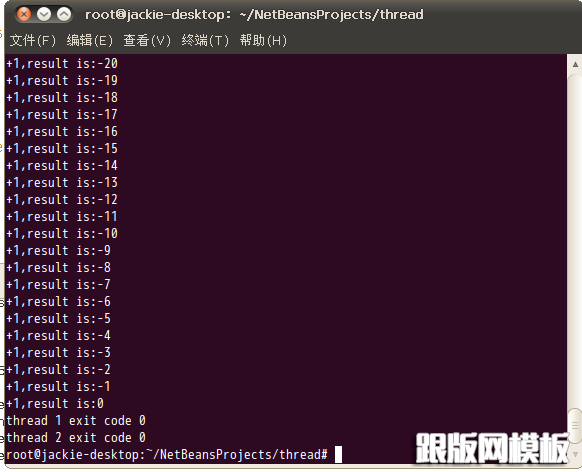
乍一看,结果是对的,加500次,减500次,最后结果为0。但是仔细看所有的输出,你会发现有异样的东西。
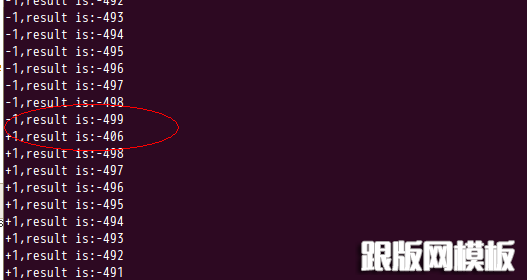
导致这个不和谐出现的原因是,两个线程可以对同一变量进行修改。假如线程1执行tmp=50+1后,被系统中断,此时线程2对num=50执行了减一操作,当线程1恢复,在执行num=tmp=51。而正确结果应为50。所以当多个线程对共享区域进行修改时,应该采用同步的方式。
五、线程同步线程同步的三种方式:
1、互斥量 互斥量用pthread_mutex_t数据类型来表示。
两种方式初始化,第一种:赋值为常量PTHREAD_MUTEX_INITIALIZER;第二种,当互斥量为动态分配是,使用pthread_mutex_init函数进行初始化,使用pthread_mutex_destroy函数销毁。
#include<pthread.h>
int pthread_mutex_init (pthread_mutex_t *__mutex,
			    __const pthread_mutexattr_t *__mutexattr);
int pthread_mutex_destroy (pthread_mutex_t *__mutex);
返回值:成功-0,失败-错误编号 加解锁加锁调用pthread_mutex_lock,解锁调用pthread_mutex_unlock。
#include<pthread.h>
int pthread_mutex_lock (pthread_mutex_t *__mutex);
int pthread_mutex_unlock (pthread_mutex_t *__mutex);
使用互斥量修改上一个程序(修改部分用红色标出):
pthread_mutex_t mylock=PTHREAD_MUTEX_INITIALIZER;
void *add(void *arg) {
  int i = 0,tmp;
  for (; i <500; i++)
  {
    pthread_mutex_lock(&mylock);
    tmp=num+1;
    num=tmp;
    printf("+1,result is:%d\n",num);
    pthread_mutex_unlock(&mylock);
  }
  return ((void *)0);
}
void *sub(void *arg)
{
  int i=0,tmp;
  for(;i<500;i++)
  {
    pthread_mutex_lock(&mylock);
    tmp=num-1;
    num=tmp;
    printf("-1,result is:%d\n",num);
    pthread_mutex_unlock(&mylock);
  }
  return ((void *)0);
}
2、读写锁 允许多个线程同时读,只能有一个线程同时写。适用于读的次数远大于写的情况。 读写锁初始化:
#include<pthread.h>
int pthread_rwlock_init (pthread_rwlock_t *__restrict __rwlock,
				__const pthread_rwlockattr_t *__restrict
				__attr);
int pthread_rwlock_destroy (pthread_rwlock_t *__rwlock);
返回值:成功--0,失败-错误编号
加锁,这里分为读加锁和写加锁。
读加锁:
int pthread_rwlock_rdlock (pthread_rwlock_t *__rwlock)
写加锁:
int pthread_rwlock_wrlock (pthread_rwlock_t *__rwlock)
解锁用同一个函数:
int pthread_rwlock_unlock (pthread_rwlock_t *__rwlock)
3、条件变量条件变量用pthread_cond_t数据类型表示。条件变量本身由互斥量保护,所以在改变条件状态前必须锁住互斥量。
条件变量初始化:
第一种,赋值常量PTHREAD_COND_INITIALIZER;第二种,使用pthread_cond_init函数
int pthread_cond_init (pthread_cond_t *__restrict __cond,
   __const pthread_condattr_t *__restrict
   __cond_attr);int pthread_cond_destroy (pthread_cond_t *__cond);
条件等待
使用pthread_cond_wait等待条件为真。
 pthread_cond_wait (pthread_cond_t *__restrict __cond,
   pthread_mutex_t *__restrict __mutex)
这里需要注意的是,调用pthread_cond_wait传递的互斥量已锁定,pthread_cond_wait将调用线程放入等待条件的线程列表,然后释放互斥量,在pthread_cond_wait返回时,再次锁定互斥量。
唤醒线程
pthread_cond_signal唤醒等待该条件的某个线程,pthread_cond_broadcast唤醒等待该条件的所有线程。
int pthread_cond_signal (pthread_cond_t *__cond);
int pthread_cond_broadcast (pthread_cond_t *__cond)
来一个例子,主线程启动4个线程,每个线程有一个参数i(i=生成顺序),无论线程的启动顺序如何,执行顺序只能为,线程0、线程1、线程2、线程3。
#include <stdio.h>
#include <stdlib.h>
#include <pthread.h>
#include <unistd.h>
#include <string.h>
#define DEBUG 1

int num=0;
pthread_mutex_t mylock=PTHREAD_MUTEX_INITIALIZER;
pthread_cond_t qready=PTHREAD_COND_INITIALIZER;
void * thread_func(void *arg)
{
  int i=(int)arg;
  int ret;
  sleep(5-i);//线程睡眠,然最先生成的线程,最后苏醒
  pthread_mutex_lock(&mylock);//调用pthread_cond_wait前,必须获得互斥锁
  while(i!=num)
  {
#ifdef DEBUG
    printf("thread %d waiting\n",i);
#endif
    ret=pthread_cond_wait(&qready,&mylock);//该函数把线程放入等待条件的线程列表,然后对互斥锁进行解锁,这两部都是原子操作。并且在pthread_cond_wait返回时,互斥量再次锁住。
    if(ret==0)
    {
#ifdef DEBUG
      printf("thread %d wait success\n",i);
#endif
    }else
    {
#ifdef DEBUG
      printf("thread %d wait failed:%s\n",i,strerror(ret));
#endif
    }
  }
  printf("thread %d is running \n",i);
  num++;
  pthread_mutex_unlock(&mylock);//解锁
  pthread_cond_broadcast(&qready);//唤醒等待该条件的所有线程
  return (void *)0;
}
int main(int argc, char** argv) {

  int i=0,err;
  pthread_t tid[4];
  void *tret;
  for(;i<4;i++)
  {
    err=pthread_create(&tid[i],NULL,thread_func,(void *)i);
    if(err!=0)
    {
      printf("thread_create error:%s\n",strerror(err));
      exit(-1);
    }
  }
  for (i = 0; i < 4; i++)
  {
    err = pthread_join(tid[i], &tret);
    if (err != 0)
    {
      printf("can not join with thread %d:%s\n", i,strerror(err));
      exit(-1);
    }
  }
  return 0;
}
在非DEBUG模式,执行结果如图所示:
在DEBUG模式,执行结果如图所示: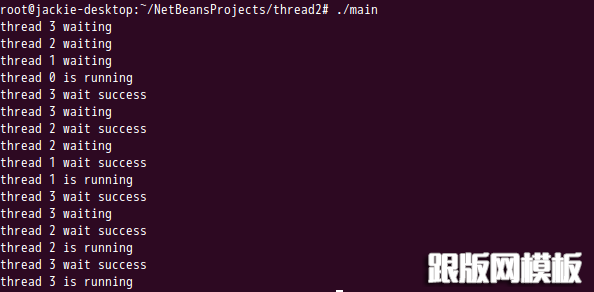
在DEBUG模式可以看出,线程3先被唤醒,然后执行pthread_cond_wait(输出thread 3 waiting),此时在pthread_cond_wait中先解锁互斥量,然后进入等待状态。这是thread 2加锁互斥量成功,进入pthread_cond_wait(输出thread 2 waiting) ,同样解锁互斥量,然后进入等待状态。直到线程0,全局变量与线程参数i一致,满足条件,不进入条件等待,输出thread 0 is running。全局变量num执行加1操作,解锁互斥量,然后唤醒所有等待该条件的线程。thread 3 被唤醒,输出thread 3 wait success。但是不满足条件,再次执行pthread_cond_wait。如此执行下去,满足条件的线程执行,不满足条件的线程等待。